 Charterhouse Blog
Docker Swarm Networking (aka foundation for the private blockchain)
The most natural use of docker swarms is to deploy a load-balanced service with a number of replicas. A slightly less common use case is when you want to deploy a service in such a way that each container is being deployed to a separate host and being directly accessible from the outside (so without mesh routing). Can we still take advantage of a docker swarm in such a scenario? Or, even better question: does it still qualify as the intended use of docker swarms?
In trying to answer this question, I found myself a bit overwhelmed with the networking infrastructure used by docker swarms. Or put it another way: I started to feel an urgent need to gain a better understanding of how networking in Docker actually works.
Hence, in this post, I document my journey through the world of Docker networks. As a running example, I will be building a private blockchain network with one bootnode, two regular nodes and one miner.
Service deployments and port publishing modes
So, does the use of swarm to achieve a sort of a P2P network configuration falls under the intended use?
The original docker documentation gives us some hints. Firstly, in How services work we learn that there are two deployment modes: global and replicated:
For a replicated service, you specify the number of identical tasks you want to run. For example, you decide to deploy an HTTP service with three replicas, each serving the same content.
A global service is a service that runs one task on every node. There is no pre-specified number of tasks. Each time you add a node to the swarm, the orchestrator creates a task and the scheduler assigns the task to the new node. Good candidates for global services are monitoring agents, an anti-virus scanners or other types of containers that you want to run on every node in the swarm.
You can specify the deployment mode by passing the --mode option to docker service create command or by using the mode attribute in your docker compose file. The default value is replicated.
Thus, a global service deployment seems to fit our purpose: we do want to have one container instance running on each node.
That’s great, but what about the node-balancing?
We know that, by default, each swarm node is connected to a so called overlay ingress network. By default the ingress networks uses a so called routing mesh. Routing mesh was introduced in Docker 1.12 and it uses ipvs and iptables to create a load balancer. We will not discuss the details of how ipvs and iptables are used to achieve that. What matters to us, is that each port published in ingress mode (the default) will be available on each node in the swarm - even when there is no task (task == an instance of a container) running on that node. The load balancer will make sure that the request is routed to one of the running replicas. The following paragraph from Section Configure service discovery in Manage swarm service network document gives a very understandable description of how the default load-balancing works in ingress mode:
By default, when you attach a service to a network and that service publishes one or more ports, Docker assigns the service a virtual IP (VIP), which is the “front end” for clients to reach the service. Docker keeps a list of all worker nodes in the service, and routes requests between the client and one of the nodes. Each request from the client might be routed to a different node.
In the same document we read that there is also a so called DNS round-robin (DNSRR) service discovery that is not based on a single virtual IP. It is useful when you want to use your own load balancer.
Clearly, the ingress routing mesh is not what we want to keep here. The global service deployment allows us to have exactly one service task running on each node in the swarm, but we still want each task from our service to remain independently accessible - so shortly, we do not want to have any load balancing in front of our nodes. And it seems that someone at docker already thought about it.
In Docker Reference Architecture in section External Access for Docker Services we learn about Docker port publishing modes.
There are two modes of port publishing for services, host mode and ingress mode.
The ingress publishing mode, the default one, utilizes the Swarm Routing Mesh to apply
load balancing across the tasks in a service. That’s what we describe above. And we do not
want it. The host publishing mode, on the other hand, exposes ports only on the host
where specific service tasks are running. The port is mapped directly to the container on
that host. Of course, in order to prevent port collision, we have make sure that there is
only a single task of a given service that runs on the given host. And this is where
host mode publishing and global deployment mode come nicely hand in hand. The Ingress
Design section of Docker Reference Architecture lists most common situations where
global containers in host publishing mode are handy.
After having a potential solution on the horizon, lets see an actual example and lets confirm that the underlaying network infrastructure is what we expect it to be.
The picture below shows the intended configuration of our swarm:

In this picture, test-net, test-net-miner-worker, and test-net-worker are the names of the swarm nodes. The test-node is a manager of the swarm. All are EC2 AWS instances: test-net-miner-worker is a medium instance, and test-net and test-net-worker are micro instances. Different colors correspond to two different stacks: boot and nodes. bootnode is our private blockchain network bootnode that together with visualizer form the boot stack. visualizer (dockersamples/docker-swarm-visualizer) is a service that allows us to visualise the tasks deployed to swarm nodes. The picture below shows the actual deployment as shown by the visualizer:
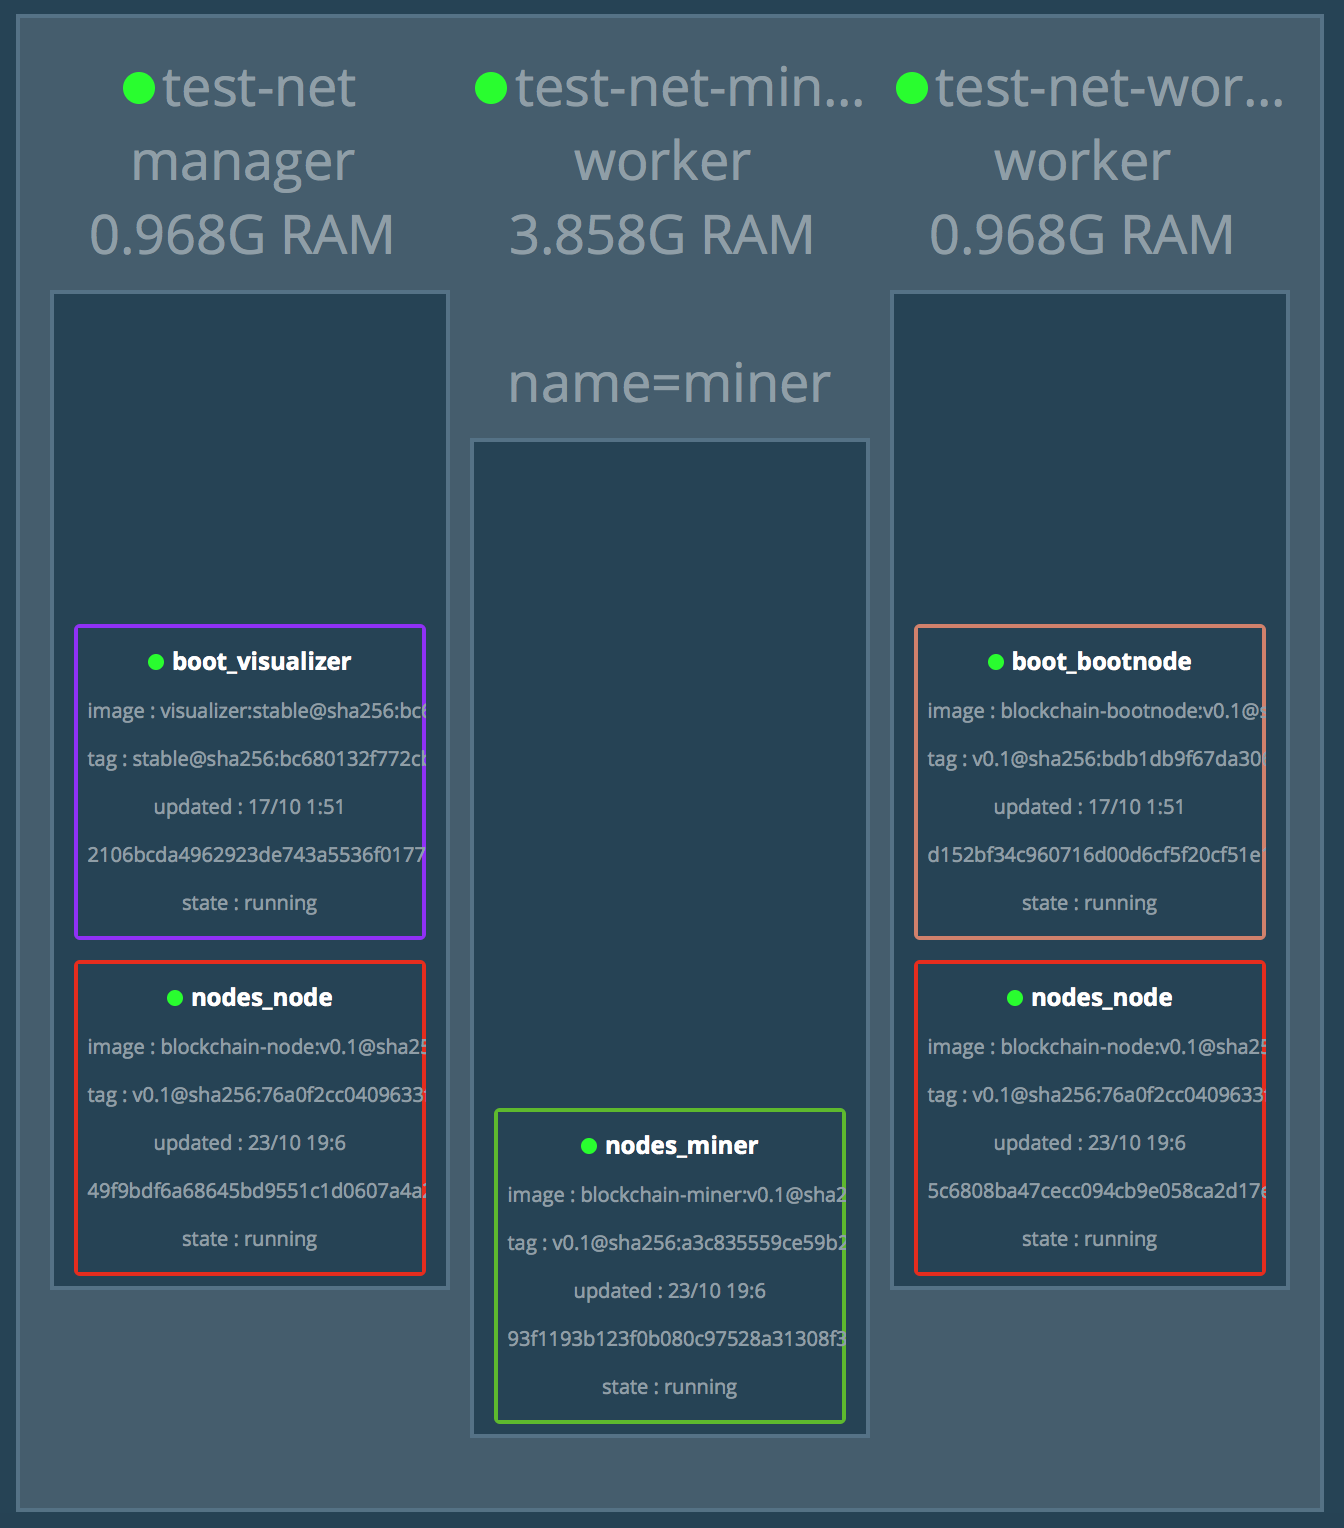
nodes_node and nodes_miner belong to the second stack: nodes. A node is a regular blockchain node, while a miner is a mining node.
Finally, the boot stack is deployed first, and the nodes stack second. This is
because, the nodes stack needs to know the enode URL of the bootnode.
We will first take a look at the swarm after first stack is deployment. We will show how to investigate the underlying network, and finally, we will deploy the second stack to show the complete picture.
The boot stack
We will first deploy the boot stack. Our swarm will look like this:

Creating EC2 instances
We will not dive into details of creating AWS EC2 instances for our nodes. We use the Docker recommended VPC setup with three subnets, each in a separate availability zone. For the purpose of showing the underlaying network infrastructure, it does not matter in which zone or a subnet we start our EC2 instances. Just to show that, we will start the test-net and test-net-worker nodes in one subnet (availability zone a), while the test-net-miner-worker node will run in another subnet (availability zone b).
We present the commands we used to start EC2 instances below:
docker-machine create --driver amazonec2 \
  --amazonec2-region eu-west-1 \
  --amazonec2-subnet-id subnet-1bd1a77c \
  --amazonec2-vpc-id vpc-94ec97f3 \
  --amazonec2-instance-type t2.micro \
  test-net
docker-machine create --driver amazonec2 \
  --amazonec2-region eu-west-1 \
  --amazonec2-subnet-id subnet-1bd1a77c \
  --amazonec2-vpc-id vpc-94ec97f3 \
  --amazonec2-instance-type t2.micro \
  test-net-worker
docker-machine create --driver amazonec2 \
  --amazonec2-region eu-west-1 \
  --amazonec2-subnet-id subnet-ef3e46a6 \
  --amazonec2-vpc-id vpc-94ec97f3 \
  --amazonec2-instance-type t2.medium \
  --amazonec2-zone "b" \
  test-net-miner-worker
% docker-machine ls
NAME                    ACTIVE  DRIVER       STATE     URL                        SWARM   DOCKER        ERRORS

test-net                -       amazonec2    Running   tcp://34.240.161.173:2376          v17.09.0-ce
test-net-miner-worker   -       amazonec2    Running   tcp://52.50.48.241:2376            v17.10.0-ce
test-net-worker         -       amazonec2    Running   tcp://34.249.241.0:2376            v17.09.0-ce
Initializing swarm, adding the manager, and the first worker
We connect to the machine where we want the swarm manager to run (test-net):
$ docker-machine env test-net
export DOCKER_TLS_VERIFY="1"
export DOCKER_HOST="tcp://34.240.161.173:2376"
export DOCKER_CERT_PATH="/Users/mczenko/.docker/machine/machines/test-net"
export DOCKER_MACHINE_NAME="test-net"
# Run this command to configure your shell:
# eval $(docker-machine env test-net)

$ eval $(docker-machine env test-net)
We can also directly ssh to the machine by running:
$ docker-machine ssh test-netand execute all the following docker commands there. Notice, however, that you will need to add
sudoin front of each docker-related command.
Once there, we run:
$ docker swarm init
Swarm initialized: current node (p1wwn2roanksz8ac002oa3n0i) is now a manager.

To add a worker to this swarm, run the following command:

    docker swarm join \
    --token SWMTKN-1-33wtt119mlt3pcni82crdxcyxqqqt2o607opfwwj2so644f2v3-78zkfrynuxn8p20etff6i69j5 \
    172.31.18.69:2377

To add a manager to this swarm, run 'docker swarm join-token manager' and follow the instructions.
This will initialize swarm and will make the current node a swarm manager. The command returns a join token, which is needed every time you want to add a new worker node to the swarm. In case you do not have it anymore, you can always retrieve it later by running:
$ docker swarm join-token -q worker
SWMTKN-1-33wtt119mlt3pcni82crdxcyxqqqt2o607opfwwj2so644f2v3-78zkfrynuxn8p20etff6i69j5
Having the join token, in another terminal, connect to the test-net-worker machine and then run:
$ docker swarm join \
    --token SWMTKN-1-33wtt119mlt3pcni82crdxcyxqqqt2o607opfwwj2so644f2v3-78zkfrynuxn8p20etff6i69j5 \
    172.31.18.69:2377
This node joined a swarm as a worker.
We can confirm that our swarm has now two nodes - one manager and one worker - by returning to the manager machine and running:
$ docker node ls
ID                            HOSTNAME                STATUS              AVAILABILITY        MANAGER STATUS
p1wwn2roanksz8ac002oa3n0i *   test-net                Ready               Active              Leader
zq4nwih9wdhxbm3u5ww3lgk7g     test-net-worker         Ready               Active
Our swarm initial swarm is ready and we are ready to deploy the boot stack.
Deploying the boot stack
We will use a docker compose file to declaratively describe our stacks. Let’s first take a look at the docker compose file for the boot stack (docker-compose-boot.yml):
version: "3.4"
services:
  bootnode:
    image: charterhouse/blockchain-bootnode:v0.1
    deploy:
      placement:
        constraints: [node.role != manager]
      restart_policy:
        condition: on-failure
    ports:
      - target: 30301
        published: 30301
        protocol: tcp
        mode: host
    volumes:
      - type: volume
        source: data
        target: /node/data
  visualizer:
    image: dockersamples/visualizer:stable
    ports:
      - "8080:8080"
    volumes:
      - "/var/run/docker.sock:/var/run/docker.sock"
    deploy:
      placement:
        constraints: [node.role == manager]
volumes:
  data:
We see that there are two services here: one is bootnode, the second is visualizer. We use placement constraints to make sure that bootnode is placed on any node that the swarm manager node, and we want the opposite for the manager. Now, for the interesting part. Both services are using the default deployment mode, which, recall, is replicated. We do not specify number of replicas for any of them, which means there will one instance of bootnode and one instance of visualizer. Now, in the port sections we see important differences between the two services. The bootnode service specifies port publishing mode to be host while the visualizer service assumes the default, which is ingress.
If you would use CLI instead of a docker compose file to create a service, the port publishing mode can only be specified using so called long syntax:
--publish mode=host,target=30301,published=30301,protocol=tcpIf we use the defaults, like in
visualizer, we could just use:-p 8080:8080(target:published).
We are ready to deploy our stack. From the swarm manager node (test-net), run:
docker stack deploy -c docker-compose-boot.yml boot
As expected this will create two services: boot_bootnode and boot_visualizer (the name prefix in front of the service name specified in the docker compose file is the name of the stack that we passed as the last argument to the command above). The command will also create a default overlay network named boot_default.
Now, we should be able to access our bootnode and extract its enode url that we will use later when deploying the nodes stack.
We specified that bootnode should be deployed to a node that is not a swarm manager. Because at this stage we only have one non-manager swarm node - test-net-worker - this is where we should find the corresponding Docker container running. After logging into test-net-worker machine, execute:
$ docker container ls
CONTAINER ID        IMAGE
d152bf34c960        charterhouse/blockchain-bootnode:v0.1
...

$ docker exec -it d152bf34c960 /bin/bash
root@d152bf34c960:/node# geth attach ipc:/node/data/geth.ipc
Welcome to the Geth JavaScript console!

instance: Geth/v1.7.2-stable-1db4ecdc/linux-amd64/go1.9
 modules: admin:1.0 debug:1.0 eth:1.0 miner:1.0 net:1.0 personal:1.0 rpc:1.0 txpool:1.0 web3:1.0
> admin.nodeInfo.enode
"enode://96e26cf742db3f4bd74d7f7e11e87d83abba370e227756f3da735a902c3c07584f3bc077d1988091a91f68c0f0dec3a23704948ebe061c1a0484f63f63054ae4@[::]:30301"
In order to obtain a complete enode url from the returned value, we have to replace the [::] part with the (private) IP address of the EC2 instance where the bootnode is deployed. In our case it is 172.31.18.53, therefore the complete enode url of the bootnode is:
enode://96e26cf742db3f4bd74d7f7e11e87d83abba370e227756f3da735a902c3c07584f3bc077d1988091a91f68c0f0dec3a23704948ebe061c1a0484f63f63054ae4@172.31.18.53:30301
We will use this enode url later when deploying the nodes stack.
Having our services deployed, this seems to be the right moment to look a bit deeper under the hood in order to understand how our services talk to each other.
Exploring docker networking infrastructure
In looking at our current deployment we skip many details (as this would require a book on its own), but we rather focus on how to extract the information that will let us see how docker services are connected in our not so common example.
Let’s go to the swarm manager node:
$ docker-machine ssh test-net
Now let’s run:
$ sudo ip -details addr
1: lo: <LOOPBACK,UP,LOWER_UP> mtu 65536 qdisc noqueue state UNKNOWN group default qlen 1
    link/loopback 00:00:00:00:00:00 brd 00:00:00:00:00:00 promiscuity 0
    inet 127.0.0.1/8 scope host lo
       valid_lft forever preferred_lft forever
    inet6 ::1/128 scope host
       valid_lft forever preferred_lft forever
2: eth0: <BROADCAST,MULTICAST,UP,LOWER_UP> mtu 9001 qdisc pfifo_fast state UP group default qlen 1000
    link/ether 02:8d:10:78:8f:e2 brd ff:ff:ff:ff:ff:ff promiscuity 0
    inet 172.31.18.69/20 brd 172.31.31.255 scope global eth0
       valid_lft forever preferred_lft forever
    inet6 fe80::8d:10ff:fe78:8fe2/64 scope link
       valid_lft forever preferred_lft forever
4: docker0: <NO-CARRIER,BROADCAST,MULTICAST,UP> mtu 1500 qdisc noqueue state DOWN group default
    link/ether 02:42:53:f2:44:1a brd ff:ff:ff:ff:ff:ff promiscuity 0
    bridge forward_delay 1500 hello_time 200 max_age 2000 ageing_time 30000 stp_state 0 priority 32768 vlan_filtering 0 vlan_protocol 802.1Q
    inet 172.17.0.1/16 scope global docker0
       valid_lft forever preferred_lft forever
9: docker_gwbridge: <BROADCAST,MULTICAST,UP,LOWER_UP> mtu 1500 qdisc noqueue state UP group default
    link/ether 02:42:2f:f5:c1:14 brd ff:ff:ff:ff:ff:ff promiscuity 0
    bridge forward_delay 1500 hello_time 200 max_age 2000 ageing_time 30000 stp_state 0 priority 32768 vlan_filtering 0 vlan_protocol 802.1Q
    inet 172.18.0.1/16 scope global docker_gwbridge
       valid_lft forever preferred_lft forever
    inet6 fe80::42:2fff:fef5:c114/64 scope link
       valid_lft forever preferred_lft forever
11: veth59b612a@if10: <BROADCAST,MULTICAST,UP,LOWER_UP> mtu 1500 qdisc noqueue master docker_gwbridge state UP group default
    link/ether 32:76:d3:5d:7e:5a brd ff:ff:ff:ff:ff:ff link-netnsid 1 promiscuity 1
    veth
    bridge_slave state forwarding priority 32 cost 2 hairpin off guard off root_block off fastleave off learning on flood on
    inet6 fe80::3076:d3ff:fe5d:7e5a/64 scope link
       valid_lft forever preferred_lft forever
36: veth1b25625@if35: <BROADCAST,MULTICAST,UP,LOWER_UP> mtu 1500 qdisc noqueue master docker_gwbridge state UP group default
    link/ether ae:da:58:0c:61:52 brd ff:ff:ff:ff:ff:ff link-netnsid 6 promiscuity 1
    veth
    bridge_slave state forwarding priority 32 cost 2 hairpin off guard off root_block off fastleave off learning on flood on
    inet6 fe80::acda:58ff:fe0c:6152/64 scope link
       valid_lft forever preferred_lft forever
60: veth574ac0b@if59: <BROADCAST,MULTICAST,UP,LOWER_UP> mtu 1500 qdisc noqueue master docker_gwbridge state UP group default
    link/ether e6:fe:b0:81:95:3c brd ff:ff:ff:ff:ff:ff link-netnsid 8 promiscuity 1
    veth
    bridge_slave state forwarding priority 32 cost 2 hairpin off guard off root_block off fastleave off learning on flood on
    inet6 fe80::e4fe:b0ff:fe81:953c/64 scope link
       valid_lft forever preferred_lft forever
We see a number of network interfaces. They all belong to the host (a Docker Swarm node). The host has its own network stack (naturally) and all the service containers that run on the given host also have their own network namespace. Moreover, as we will see, each overlay network gets its own network namespace on each host that is connected to it.
There are many good reading resources on network namespaces. To get a good intro/refresh on Linux namespaces I would recommend Introducing Linux Network Namespaces for a more general overview and Container Namespaces – Deep Dive into Container Networking for more Docker-specific perspective.
From the host environment, it is possible to list all involved network namespaces by using ip netns command. It needs some setup though, as it does not work out of the box. From the docker machine run the following commands:
$ cd /var/run
$ sudo ln -s /var/run/docker/netns netns
And now:
$ sudo ip netns
d416717e3884 (id: 6)
1-njd15rznze (id: 5)
1-ujjyfjaj0m (id: 0)
ingress_sbox (id: 1)
We see here five network namespaces that are present on the host. Finding which one is not very easy, but still possible. First let’s list the docker networks on this host:
$ sudo docker network ls
NETWORK ID          NAME                DRIVER              SCOPE
njd15rznzeua        boot_default        overlay             swarm
c171dfb8f857        bridge              bridge              local
fd902a348f7e        docker_gwbridge     bridge              local
fe277b49daa8        host                host                local
ujjyfjaj0mcd        ingress             overlay             swarm
ba680556f5d3        none                null                local
We see quite a number of them. Let’s go shortly over them. boot_default is the default overlay network that was created at the moment that we deployed the boot stack. bridge, host, and none are networks you find on every Docker installation. This is quite well explained in Docker container networking and in Network settings. The bridge network is the default, but you can make it explicit with the --network="bridge" option to docker run command. On one side it attaches to host via docker0 interface and to the container on the other side via pair of veth interfaces. host (--network="host") connects the container directly to the host networking stack, so there is no isolation, but it is also the fastest connection possible. By using none (--network="none") you effectively say that the container will not have access to any external routes.
In our case, none of these three default networks are in use. In swarm node, we are given another bridge network called docker_gwbridge. In the host port publishing mode (do not mistake it with the host network that we discussed above), the docker_gwbridge is responsible for both egress and ingress traffic (out and in). In the ingress port publishing mode, the docker_gwbridge carries the egress traffic, while the ingress traffic is handled by another network that is created for swarm nodes: the ingress overlay network (we already described it a bit in the text above).
Recall, that we use host publishing for our bootnode service and the default ingress publishing for visualizer. What we expect is that the visualizer is connected to the ingress network for the ingress (external in) traffic with mesh routing, to the docker_bridge network for the egress (external out) traffic, and to the boot_default overlay network for in-swarm communication with other containers.
Ok, but let’s go back to the network namespaces. From the network ids and the namespaces identifiers, we suspect that there is a connection between njd15rznzeua network id (boot_default) and 1-njd15rznze network namespace. In the same way there may be a connection between ujjyfjaj0mcd network id (boot_default) and 1-ujjyfjaj0m network namespace. Let’s check that this indeed is the case. Let’s take a look what’s inside of the 1-njd15rznze network namespace. From test-net host run:
$ sudo ip netns exec 1-njd15rznze ip -details addr
1: lo: <LOOPBACK,UP,LOWER_UP> mtu 65536 qdisc noqueue state UNKNOWN group default qlen 1
    link/loopback 00:00:00:00:00:00 brd 00:00:00:00:00:00 promiscuity 0
    inet 127.0.0.1/8 scope host lo
       valid_lft forever preferred_lft forever
2: br0: <BROADCAST,MULTICAST,UP,LOWER_UP> mtu 1450 qdisc noqueue state UP group default
    link/ether 06:09:fa:4e:10:9c brd ff:ff:ff:ff:ff:ff promiscuity 0
    bridge forward_delay 1500 hello_time 200 max_age 2000 ageing_time 30000 stp_state 0 priority 32768 vlan_filtering 0 vlan_protocol 802.1Q
    inet 10.0.0.1/24 scope global br0
       valid_lft forever preferred_lft forever
37: vxlan0: <BROADCAST,MULTICAST,UP,LOWER_UP> mtu 1450 qdisc noqueue master br0 state UNKNOWN group default
    link/ether 96:b0:7c:39:2e:c4 brd ff:ff:ff:ff:ff:ff link-netnsid 0 promiscuity 1
    vxlan id 4097 srcport 0 0 dstport 4789 proxy l2miss l3miss ageing 300
    bridge_slave state forwarding priority 32 cost 100 hairpin off guard off root_block off fastleave off learning on flood on
39: veth0@if38: <BROADCAST,MULTICAST,UP,LOWER_UP> mtu 1450 qdisc noqueue master br0 state UP group default
    link/ether 06:09:fa:4e:10:9c brd ff:ff:ff:ff:ff:ff link-netnsid 1 promiscuity 1
    veth
    bridge_slave state forwarding priority 32 cost 2 hairpin off guard off root_block off fastleave off learning on flood on
We see that this network namespace has a bridge br0 with gateway address 10.0.0.1/24 and two network interfaces. One virtual eth interface: veth0, and a vxlan0 - a VXLAN Tunnel Endpoint (VTEP) of the virtual Layer 2 overlay network. Now, to see that this is actually the boot_default overlay network, let’s inspect njd15rznzeua network:
$ sudo docker network inspect boot_default
[
    {
        "Name": "boot_default",
        "Id": "njd15rznzeuaeuvnjdxr7c2w3",
        "Created": "2017-10-16T23:51:56.977709577Z",
        "Scope": "swarm",
        "Driver": "overlay",
        "EnableIPv6": false,
        "IPAM": {
            "Driver": "default",
            "Options": null,
            "Config": [
                {
                    "Subnet": "10.0.0.0/24",
                    "Gateway": "10.0.0.1"
                }
            ]
        },
        "Internal": false,
        "Attachable": false,
        "Ingress": false,
        "ConfigFrom": {
            "Network": ""
        },
        "ConfigOnly": false,
        "Containers": {
            "2106bcda4962923de743a5536f0177878758abc5259739980701e91e55494d7f": {
                "Name": "boot_visualizer.1.ruxyuicwouirh2tl2nxjt4pac",
                "EndpointID": "533c9ac221cac8efe607ffd8292a2c5b44002c9a6e95dd7d25c2f0b4c4c73fb7",
                "MacAddress": "02:42:0a:00:00:03",
                "IPv4Address": "10.0.0.3/24",
                "IPv6Address": ""
            }
        },
        "Options": {
            "com.docker.network.driver.overlay.vxlanid_list": "4097"
        },
        "Labels": {
            "com.docker.stack.namespace": "boot"
        },
        "Peers": [
            {
                "Name": "test-net-00bd164ff36d",
                "IP": "172.31.18.69"
            }
        ]
    }
]
We see in the Config section that its gateway address is indeed 10.0.0.1 and it has a container connected to it: boot_visualizer with address 10.0.0.3/24. Now, looking at virtual interfaces returned by ip netns exec 1-njd15rznze ip -details addr, we see that they indicate the other end of the connection. For instance from veth0@if38 we read that the other end of the connection has index 38. Let’s find it by looking at the network interfaces at the visualizer container:
$ sudo docker exec 2106bcda4962 ip addr
1: lo: <LOOPBACK,UP,LOWER_UP> mtu 65536 qdisc noqueue state UNKNOWN qlen 1
    link/loopback 00:00:00:00:00:00 brd 00:00:00:00:00:00
    inet 127.0.0.1/8 scope host lo
       valid_lft forever preferred_lft forever
    inet 10.0.0.2/32 scope global lo
       valid_lft forever preferred_lft forever
    inet 10.255.0.4/32 scope global lo
       valid_lft forever preferred_lft forever
33: eth2@if34: <BROADCAST,MULTICAST,UP,LOWER_UP,M-DOWN> mtu 1450 qdisc noqueue state UP
    link/ether 02:42:0a:ff:00:05 brd ff:ff:ff:ff:ff:ff
    inet 10.255.0.5/16 scope global eth2
       valid_lft forever preferred_lft forever
35: eth1@if36: <BROADCAST,MULTICAST,UP,LOWER_UP,M-DOWN> mtu 1500 qdisc noqueue state UP
    link/ether 02:42:ac:12:00:03 brd ff:ff:ff:ff:ff:ff
    inet 172.18.0.3/16 scope global eth1
       valid_lft forever preferred_lft forever
38: eth0@if39: <BROADCAST,MULTICAST,UP,LOWER_UP,M-DOWN> mtu 1450 qdisc noqueue state UP
    link/ether 02:42:0a:00:00:03 brd ff:ff:ff:ff:ff:ff
    inet 10.0.0.3/24 scope global eth0
       valid_lft forever preferred_lft forever
where 2106bcda4962 is the id of the visualizer container (we got by running sudo docker container ls).
We see that it has a network interface 38: eth0@if39 assigned the address 10.0.0.3/24. This should make us confident that we identified the boot_default overlay network correctly and we have confirmed that visualizer is connected to it. Additionally, if we run:
$ sudo ip netns exec d416717e3884 ip -details addr
1: lo: <LOOPBACK,UP,LOWER_UP> mtu 65536 qdisc noqueue state UNKNOWN group default qlen 1
    link/loopback 00:00:00:00:00:00 brd 00:00:00:00:00:00 promiscuity 0
    inet 127.0.0.1/8 scope host lo
       valid_lft forever preferred_lft forever
    inet 10.0.0.2/32 scope global lo
       valid_lft forever preferred_lft forever
    inet 10.255.0.4/32 scope global lo
       valid_lft forever preferred_lft forever
33: eth2@if34: <BROADCAST,MULTICAST,UP,LOWER_UP> mtu 1450 qdisc noqueue state UP group default
    link/ether 02:42:0a:ff:00:05 brd ff:ff:ff:ff:ff:ff link-netnsid 2 promiscuity 0
    veth
    inet 10.255.0.5/16 scope global eth2
       valid_lft forever preferred_lft forever
35: eth1@if36: <BROADCAST,MULTICAST,UP,LOWER_UP> mtu 1500 qdisc noqueue state UP group default
    link/ether 02:42:ac:12:00:03 brd ff:ff:ff:ff:ff:ff link-netnsid 1 promiscuity 0
    veth
    inet 172.18.0.3/16 scope global eth1
       valid_lft forever preferred_lft forever
38: eth0@if39: <BROADCAST,MULTICAST,UP,LOWER_UP> mtu 1450 qdisc noqueue state UP group default
    link/ether 02:42:0a:00:00:03 brd ff:ff:ff:ff:ff:ff link-netnsid 0 promiscuity 0
    veth
    inet 10.0.0.3/24 scope global eth0
       valid_lft forever preferred_lft forever
we get a match: network namespace d416717e3884 is indeed associated with the visualizer container. In a similar way we can find out that there is a match between network namespace 1-ujjyfjaj0m and the ingress overlay network with id ujjyfjaj0mcd:
$ sudo ip netns exec 1-ujjyfjaj0m ip -details addr
1: lo: <LOOPBACK,UP,LOWER_UP> mtu 65536 qdisc noqueue state UNKNOWN group default qlen 1
    link/loopback 00:00:00:00:00:00 brd 00:00:00:00:00:00 promiscuity 0
    inet 127.0.0.1/8 scope host lo
       valid_lft forever preferred_lft forever
2: br0: <BROADCAST,MULTICAST,UP,LOWER_UP> mtu 1450 qdisc noqueue state UP group default
    link/ether 1a:b0:06:80:e7:d9 brd ff:ff:ff:ff:ff:ff promiscuity 0
    bridge forward_delay 1500 hello_time 200 max_age 2000 ageing_time 30000 stp_state 0 priority 32768 vlan_filtering 0 vlan_protocol 802.1Q
    inet 10.255.0.1/16 scope global br0
       valid_lft forever preferred_lft forever
6: vxlan0: <BROADCAST,MULTICAST,UP,LOWER_UP> mtu 1450 qdisc noqueue master br0 state UNKNOWN group default
    link/ether 1a:b0:06:80:e7:d9 brd ff:ff:ff:ff:ff:ff link-netnsid 0 promiscuity 1
    vxlan id 4096 srcport 0 0 dstport 4789 proxy l2miss l3miss ageing 300
    bridge_slave state forwarding priority 32 cost 100 hairpin off guard off root_block off fastleave off learning on flood on
8: veth0@if7: <BROADCAST,MULTICAST,UP,LOWER_UP> mtu 1450 qdisc noqueue master br0 state UP group default
    link/ether 5a:4e:2c:81:f6:1c brd ff:ff:ff:ff:ff:ff link-netnsid 1 promiscuity 1
    veth
    bridge_slave state forwarding priority 32 cost 2 hairpin off guard off root_block off fastleave off learning on flood on
34: veth4@if33: <BROADCAST,MULTICAST,UP,LOWER_UP> mtu 1450 qdisc noqueue master br0 state UP group default
    link/ether de:4e:de:1c:c9:f0 brd ff:ff:ff:ff:ff:ff link-netnsid 2 promiscuity 1
    veth
    bridge_slave state forwarding priority 32 cost 2 hairpin off guard off root_block off fastleave off learning on flood on

$ sudo docker network inspect ingress
[
    {
        "Name": "ingress",
        "Id": "ujjyfjaj0mcdgfizjjpeyyyj7",
        "Created": "2017-10-16T22:52:37.922899789Z",
        "Scope": "swarm",
        "Driver": "overlay",
        "EnableIPv6": false,
        "IPAM": {
            "Driver": "default",
            "Options": null,
            "Config": [
                {
                    "Subnet": "10.255.0.0/16",
                    "Gateway": "10.255.0.1"
                }
            ]
        },
        "Internal": false,
        "Attachable": false,
        "Ingress": true,
        "ConfigFrom": {
            "Network": ""
        },
        "ConfigOnly": false,
        "Containers": {
            "2106bcda4962923de743a5536f0177878758abc5259739980701e91e55494d7f": {
                "Name": "boot_visualizer.1.ruxyuicwouirh2tl2nxjt4pac",
                "EndpointID": "6f7ca1625d09fdd59066a176c4aafcf3016565fc2c94e18b8e696c4a3fc7102d",
                "MacAddress": "02:42:0a:ff:00:05",
                "IPv4Address": "10.255.0.5/16",
                "IPv6Address": ""
            },
            "ingress-sbox": {
                "Name": "ingress-endpoint",
                "EndpointID": "fca3977ee5a30bc21daa6c56019324851e4da7268afff030595d2ae2a17e3888",
                "MacAddress": "02:42:0a:ff:00:02",
                "IPv4Address": "10.255.0.2/16",
                "IPv6Address": ""
            }
        },
        "Options": {
            "com.docker.network.driver.overlay.vxlanid_list": "4096"
        },
        "Labels": {},
        "Peers": [
            {
                "Name": "test-net-00bd164ff36d",
                "IP": "172.31.18.69"
            }
        ]
    }
]
Here, we see a container named ingress-sbox connected to it. It corresponds to the ingress_sbox network namespace. Let’s inspect:
$ sudo ip netns exec ingress_sbox ip -details addr
1: lo: <LOOPBACK,UP,LOWER_UP> mtu 65536 qdisc noqueue state UNKNOWN group default qlen 1
    link/loopback 00:00:00:00:00:00 brd 00:00:00:00:00:00 promiscuity 0
    inet 127.0.0.1/8 scope host lo
       valid_lft forever preferred_lft forever
7: eth0@if8: <BROADCAST,MULTICAST,UP,LOWER_UP> mtu 1450 qdisc noqueue state UP group default
    link/ether 02:42:0a:ff:00:02 brd ff:ff:ff:ff:ff:ff link-netnsid 0 promiscuity 0
    veth
    inet 10.255.0.2/16 scope global eth0
       valid_lft forever preferred_lft forever
10: eth1@if11: <BROADCAST,MULTICAST,UP,LOWER_UP> mtu 1500 qdisc noqueue state UP group default
    link/ether 02:42:ac:12:00:02 brd ff:ff:ff:ff:ff:ff link-netnsid 1 promiscuity 0
    veth
    inet 172.18.0.2/16 scope global eth1
       valid_lft forever preferred_lft forever
Having all these outputs we can finally draw a network diagram, where we can clearly see all the connections:

Doing a similar investigation, we can also explore the networking on the second node: test-net-worker:

Deploying the nodes stack
Now that we investigated networking behind the boot stack, we are ready to deploy another stack on the same docker swarm. Below is the docker compose file for the nodes stack:
version: "3.4"
services:
  node:
    image: charterhouse/blockchain-node:v0.1
    command: enode://96e26cf742db3f4bd74d7f7e11e87d83abba370e227756f3da735a902c3c07584f3bc077d1988091a91f68c0f0dec3a23704948ebe061c1a0484f63f63054ae4@172.31.18.53:30301
    deploy:
      mode: global
      restart_policy:
        condition: on-failure
      placement:
        constraints:
          - node.labels.name != miner
    ports:
      - target: 30303
        published: 30303
        protocol: tcp
        mode: host
      - target: 8545
        published: 8545
        protocol: tcp
        mode: host
    volumes:
      - type: volume
        source: data
        target: /node/data
    networks:
      - boot_default
  miner:
    image: charterhouse/blockchain-miner:v0.1
    command: enode://96e26cf742db3f4bd74d7f7e11e87d83abba370e227756f3da735a902c3c07584f3bc077d1988091a91f68c0f0dec3a23704948ebe061c1a0484f63f63054ae4@172.31.18.53:30301
    deploy:
      mode: global
      restart_policy:
        condition: on-failure
      placement:
        constraints:
          - node.labels.name == miner
    ports:
      - target: 30303
        published: 30303
        protocol: tcp
        mode: host
    volumes:
      - type: volume
        source: data
        target: /node/data
    networks:
      - boot_default
volumes:
  data:
networks:
  boot_default:
    external: true
Here we use two separate images. One for a regular node and one for a miner. The difference between the regular node and the miner is only in the RPC settings: a miner does not expose RPC interface:
regular node (Dockerfile)
FROM ubuntu

WORKDIR /node

ADD . /node

EXPOSE 30303 8545

RUN apt-get update; \
  apt-get install -y iproute2; \
  apt-get install -y iptables; \
  apt-get install -y software-properties-common; \
  add-apt-repository -y ppa:ethereum/ethereum; \
  apt-get update; \
  apt-get install -y ethereum;

ENTRYPOINT ["/node/start.sh"]
CMD [""]
regular node (start.sh)
#!/usr/bin/env bash
set -e

msg() {
  echo
  echo $1
  echo
}

geth --datadir /node/data init /node/genesis.json

BOOTNODES=""

if [[ -z $1 ]]; then
  msg "bootnodes not provided. Was it intended?"
else
  msg "Using bootnodes: $1"
  BOOTNODES="--bootnodes $1"
fi

geth --datadir /node/data \
     --networkid 5 \
     --gasprice "20000000000" \
     --targetgaslimit "4712388" \
     --rpc --rpcport 8545 --rpcaddr "0.0.0.0" --rpcapi "db,eth,net,web3,personal,web3" \
     --port 30303 $BOOTNODES \
     2>>/node/blockchain.log
miner
FROM ubuntu

WORKDIR /node

ADD . /node

EXPOSE 30303

RUN apt-get update; \
  apt-get install -y iproute2; \
  apt-get install -y iptables; \
  apt-get install -y software-properties-common; \
  add-apt-repository -y ppa:ethereum/ethereum; \
  apt-get update; \
  apt-get install -y ethereum;

ENTRYPOINT ["/node/start.sh"]
CMD [""]
miner (start.sh)
#!/usr/bin/env bash
set -e

msg() {
  echo
  echo $1
  echo
}

geth --datadir /node/data init /node/genesis.json

BOOTNODES=""

if [[ -z $1 ]]; then
  msg "bootnodes not provided. Was it intended?"
else
  msg "Using bootnodes: $1"
  BOOTNODES="--bootnodes $1"
fi

geth --datadir /node/data \
     --networkid 5 \
     --gasprice "20000000000" \
     --targetgaslimit "4712388" \
     --port 30303 \
     $BOOTNODES \
     2>>/node/blockchain.log
We use the bootnode’s enode url that we retrieved earlier from the bootnode as the docker command on both the node and the miner. It will be appended to the entrypoint command from the node and the miner dockerfiles when starting the container. This way, the regular blockchain nodes and the miners can be properly bootstrapped when joining the blockchain network.
In all the cases we use the same genesis.json file:
{
  "config": {
        "chainId": 5,
        "homesteadBlock": 0,
        "eip155Block": 0,
        "eip158Block": 0
    },
  "alloc"      : {},
  "coinbase"   : "0x0000000000000000000000000000000000000000",
  "difficulty" : "0x20000",
  "extraData"  : "",
  "gasLimit"   : "0x2fefd8",
  "nonce"      : "0x0000000000000072",
  "mixhash"    : "0x0000000000000000000000000000000000000000000000000000000000000000",
  "parentHash" : "0x0000000000000000000000000000000000000000000000000000000000000000",
  "timestamp"  : "0x00"
}
Notice that
chainIdmatches--networkidin bothstart.shfile.
In the docker compose file for the nodes stack we use node.labels.name in the
placement constraints - this way we can place the miners and the regular nodes on the
swarm nodes that best suit them:
node:
  deploy:
    placement:
      constraints:
        - node.labels.name != miner

...

miner:
  deploy:
    placement:
      constraints:
        - node.labels.name == miner
We use the following instruction to create a label on a node:
docker node update --label-add name=miner test-net-miner-worker
Unfortunately, there is currently no easy way to check if the label was actually set. Currently, docker only supports filtering for engine-labels. The command above sets the label on the node itself, and node labels are currently not used (as of December 18, 2017) for filtering. So, the command below won’t work:
docker node ls -f "labels.name==miner"
Before, we can deploy our nodes stack, we need to add the test-net-miner-worker machine to the swarm. Connect to the test-net-miner-worker machine (using the env trick) and run:
$ docker swarm join \
    --token SWMTKN-1-33wtt119mlt3pcni82crdxcyxqqqt2o607opfwwj2so644f2v3-78zkfrynuxn8p20etff6i69j5 \
    172.31.18.69:2377
This node joined a swarm as a worker.
Recall that to get your current join token, you can run (from the swarm manager node - test-net):
$ docker swarm join-token -q worker
SWMTKN-1-33wtt119mlt3pcni82crdxcyxqqqt2o607opfwwj2so644f2v3-78zkfrynuxn8p20etff6i69j5
We deploy the nodes stack from the swarm manager node (test-net) by running:
$ docker stack deploy -c docker-compose-nodes.yml nodes
Our network gets the following structure:


This complements our tutorial on networking concepts in Docker Swarms. In the tutorial we referred to a realistic case of creating a private blockchain network with one bootnode, one regular node, and one miner. In the follow up, we will show how to deploy our network to Amazon AWS with Docker Cloud, how to further configure the blockchain nodes using Ethereum Geth, and how to connect to the network using the Ethereum Mist Wallet.