 Charterhouse Blog
Setting up a private blockchain with Ethereum on AWS
Setting up a private blockchain with ethereum on AWS has two parts:
- Setting up a virtual private cloud on AWS
- Running blockchain nodes on the private network.
Setting up a virtual private cloud on AWS
If you are not familiar with the Virtual Private Cloud (VPC) concept, we recommend you to start with What is Amazon VPC? User Guide from Amazon. If you just need some refreshment, below we copied some basic information about Amazon VPCs.
A virtual private cloud (VPC) is a virtual network dedicated to your AWS account. It is logically isolated from other virtual networks in the AWS cloud. You can launch your AWS resources, such as Amazon EC2 instances, into your VPC. You can configure your VPC; you can select its IP address range, create subnets, and configure route tables, network gateways, and security settings.
A subnet is a range of IP addresses in your VPC. You can launch AWS resources into a subnet that you select. Use a public subnet for resources that must be connected to the Internet, and a private subnet for resources that won’t be connected to the Internet. For more information about public and private subnets, see VPC and Subnet Basics.
To protect the AWS resources in each subnet, you can use multiple layers of security, including security groups and network access control lists (ACL). For more information, see Security.
Our blockchain nodes will form a private network but some nodes need to be accessible from outside - for instance to connect to a node using its RPC interface.
We’ll use unsecured connection to the nodes, making sure that a node only exposes suitable parts of its RPC modules. Later we plan to use SSL to further secure the communication between the selected nodes and external clients.
Knowing that, we will use a VPC with a public subnet in one availability zone.
AWS regions and availability zones can be used to increase fault-tolerance of the network. In our initial setup we do not take advantage of multi region, multi-zone setup. This may be added to our solution later. To learn more about AWS regions and availability zones, please consult Regions and Availability Zones on Amazon.
Before you begin
Make sure you have an Amazon AWS account with sufficient privileges.
First select the region you want to be in. In our tutorial we use eu-central-1,
which is EU (Frankfurt).
The region is always from the right-upper corner of your Amazon AWS account.
Once you have decided and selected the region you want to be in, you need to create a key pair you will use to access EC2 instances that you launch into your VPC. The public key will be stored on your instance while the private key will be downloaded to your browser so that you can store it locally.
You cannot access your instance without the private key. Keep it safe and secure on your machine (think about doing
chmod 400 <private-key-file>).
To create your key pair on Amazon AWS follow these steps:
- Go to Services > EC2 > Network & Security > Key Pairs
- Create key pair. Give your key pair a descriptive name, eg. blockchainlab.
- The private key will be automatically downloaded to your browser. Archive this file and make sure it is secured.
You can also use an existing key-pair. Check Importing Your Own Public Key to Amazon EC2 and Retrieving the Public Key for Your Key Pair on Linux for more information.
Creating VPC
We create a VPC that reflects the Recommended VPC and subnet setup from Docker documentation:
VPC
CIDR: 172.31.0.0/16
DNS hostnames: yes
DNS resolution: yes
DHCP option set: DHCP Options (Below)
INTERNET GATEWAY
VPC: VPC (above)
DHCP OPTION SET
domain-name: ec2.internal
domain-name-servers: AmazonProvidedDNS
SUBNET1
CIDR: 172.31.16.0/20
Auto-assign public IP: yes
Availability-Zone: A
SUBNET2
CIDR: 172.31.32.0/20
Auto-assign public IP: yes
Availability-Zone: B
SUBNET3
CIDR: 172.31.0.0/20
Auto-assign public IP: yes
Availability-Zone: C
ROUTE TABLE
Destination CIDR block: 0.0.0.0/0
Subnets: Subnet1, Subnet2, Subnet3
We will start with one public subnet as this is convenient to do using the Start VPC Wizard. This will provide us with the initial setup which we will extend to match the Docker recommendations.
Create VPC with a Single Public Subnet
Go to Services > VPC and click on Start VPC Wizard. We will use the first configuration: VPC with a Single Public Subnet:

For all recently new AWS accounts, there already is one default VPC. A default VPC is suitable for getting started quickly, but here, in perspective, we want to be able to support our specific requirements and for that reason we immediately proceed with a nondefault VPC. For more information, consult Default VPC and Default Subnets in the AWS documentation.
Click Select.
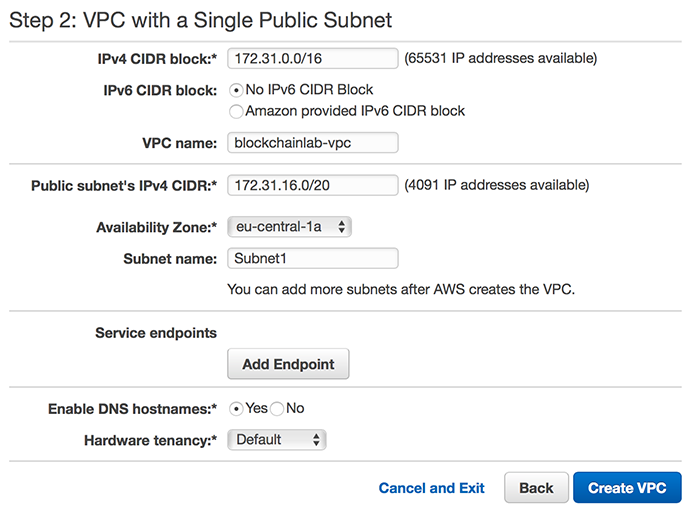
Setup VPC and public subnet
Set 172.31.0.0/16 as IPv4 CIDR block, VPC Name to blockchainlab-vpc
(you can use any name you want), Public subnet's IPv4 CIDR to 172.31.16.0/20,
Availability Zone to eu-central-1a, and Subnet name to Subnet1 as on
the picture below:
Amazon recommends the CIDR blocks from the private IPv4 address ranges as specified in RFC 1918:
10.0.0.0-10.255.255.255(10/8prefix)172.16.0.0-172.31.255.255(172.16/12prefix)192.168.0.0-192.168.255.255(192.168/16prefix).
For more information check VPC and Subnet Sizing for IPv4.
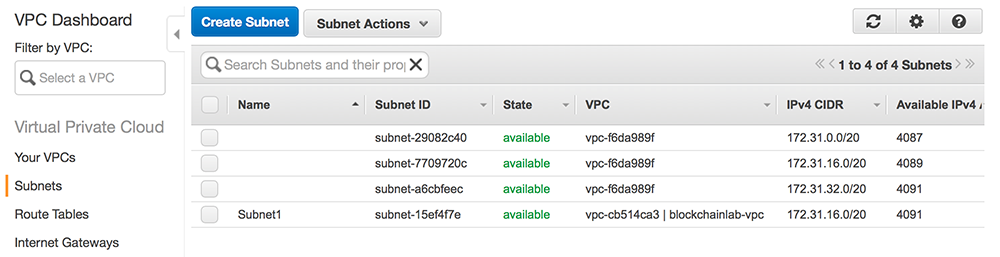
Click Create VPC and confirm with OK in the next screen. You will see you new nondefault VPC in Your VPCs group.
Create two other subnets
Select Subnets from the left panel and click on Create Subnet button:
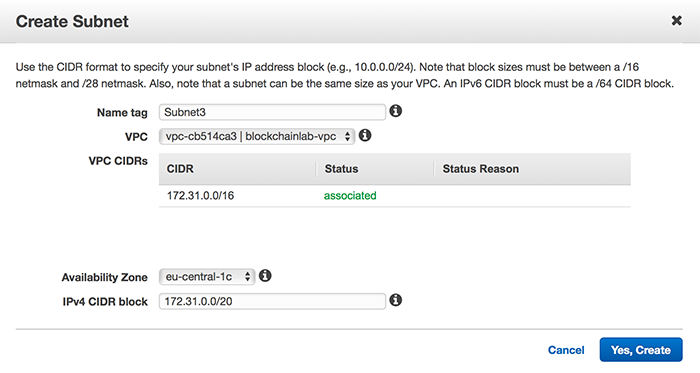
Fill in Subnet2 for Name tag, select blockchainlab-vpc as VPC and
eu-central-1b as Availability Zone. Fill in 172.31.32.0/20 as 172.31.32.0/20:

Analogically, create Subnet3:
Auto-assign public IPs
Finally, to make sure that all our instances are externally accessible,
we enable Auto-assign Public IP for our subnets. To do so, first select
Subnet1 from the list of subnets and select
Modify auto-assign IP settings from the Subnet Actions menu:
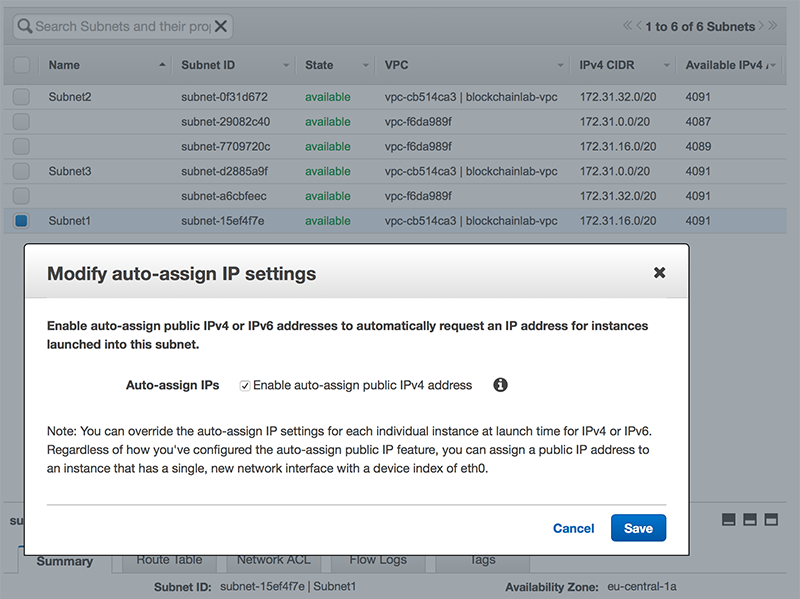
Repeat the procedure for Subnet2, Subnet3.
We may want to restrict this option later, instead of assigning public IP to all instances running in a subnet we may want to assign public IPs (e.g. by using Elastic IPs) to only selected instances.
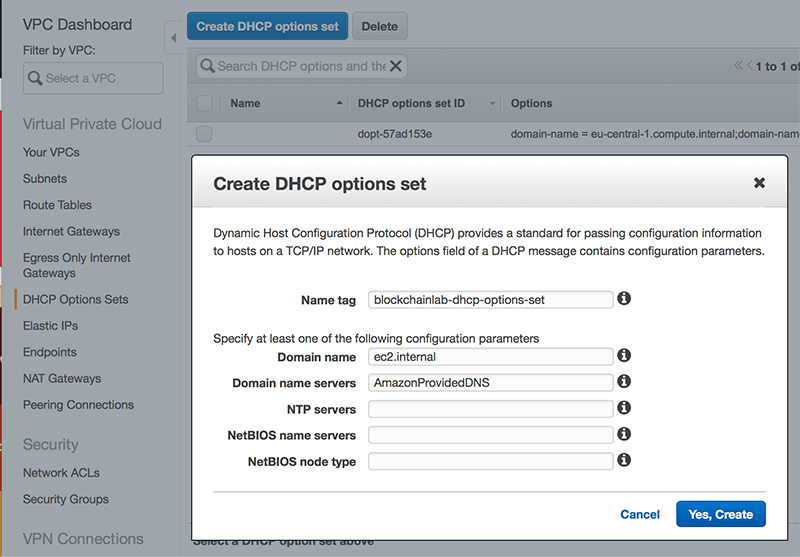
Create and assign DHCP Option Set to VPC
Finally, we will setup a separate, recommended by Docker, DHPC Option Set.
Select DHCP Option Sets and then click Create DHCP
Option Set. Set Name tag to any name of your choice (e.g.
blockchainlab-dhcp-options-set), Domain name to ec2.internal, and
Domain name servers to AmazonProvidedDNS:
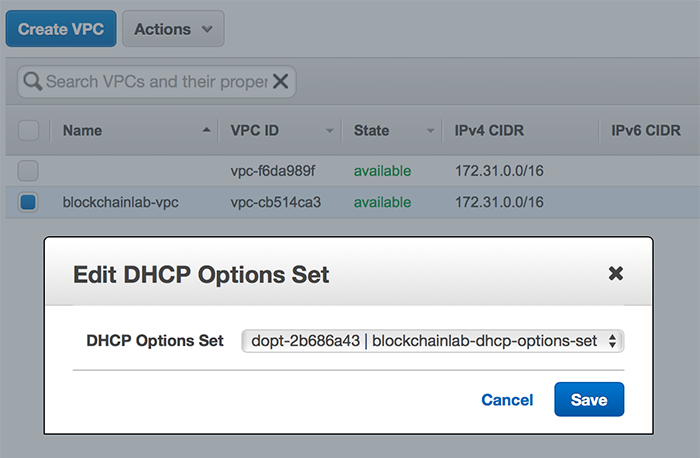
Click Yes, Create. To assign the newly created option set to our nondefault VPC, select the VPC in Your VPCs group and select Edit DHCP Options Set from the Actions menu:
Associate Subnet2 and Subnet3 with Route Table
Because we used a wizard to create VPC with one public subnet, Subnet1 is already
associated with our router. We need to make sure that Subnet2 and Subnet2 are
also associated. Select Route Tables in the left panel, select the Route Table
associated with blockchainlab-vpc and then choose the Subnet Associations in the
details panel:
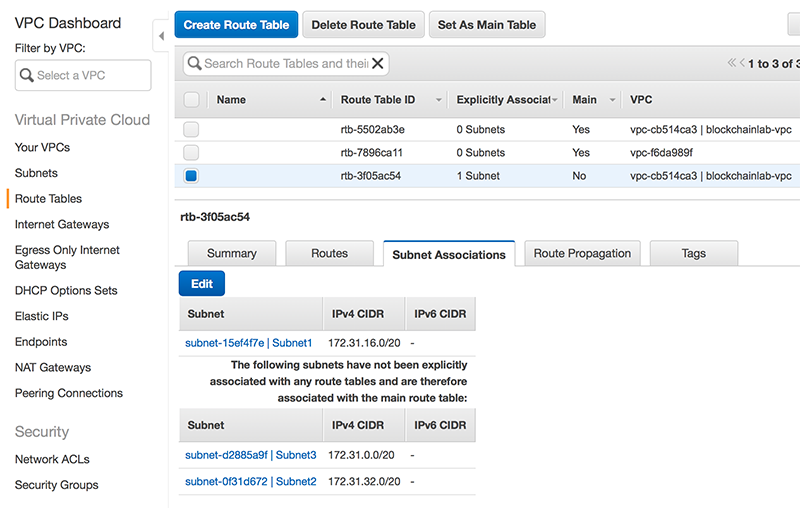
Click Edit and make sure that all subnets are associated:
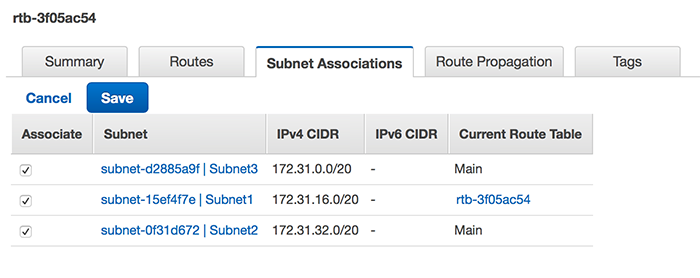
Confirm with Save.
This concludes initial setup of our VPC. Later, we will still modify the Security Group associated with our VPC in order to set suitable constraints for the inbound and outbound traffic. For now, our VPC has a default security group assigned. This group was created automatically when we created VPC and it sets unrestricted outbound traffic and allows inbound traffic from instances assigned to the same security group.
To learn more about security groups check Security Groups for Your VPC in the AWS documentation.
Running blockchain nodes on the private network.
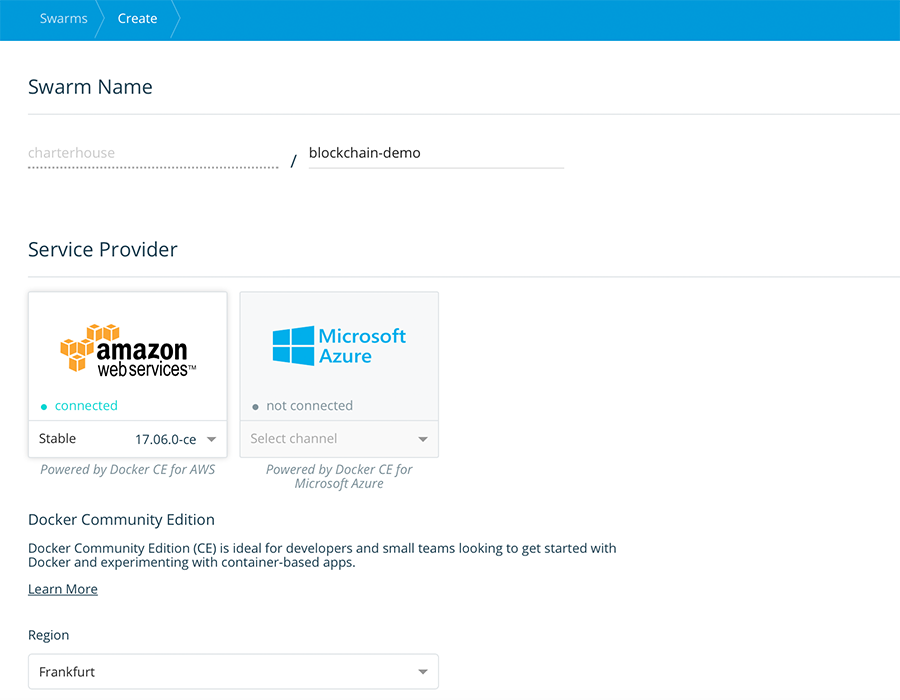
Having our VPC ready, we can now create our SWARM using Docker Cloud. Login to your docker cloud account (create one if you do not already have one), and in the Swarms panels select Create.
If you haven’t done it before, you will need to connect you AWS account to Docker Cloud. Follow the instructions in Link Amazon Web Services to Docker Cloud in Docker documentation.
Give your Swarm a descriptive name, and select Stable as the docker version that will be used with this swarm. In our example we use Frankfurt region.
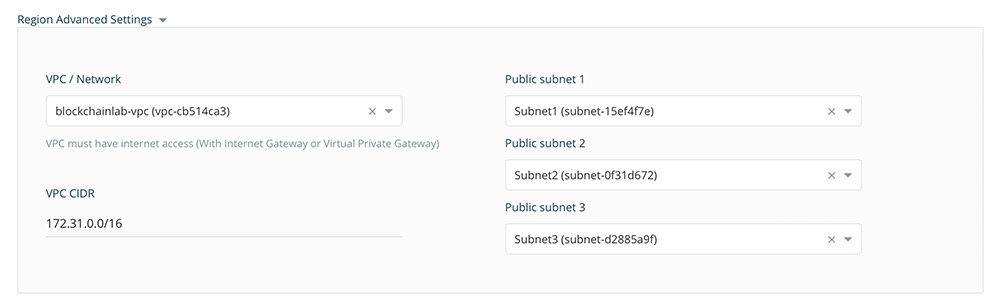
Next, in Region Advanced Settings select the blockchainlab-vpc from the list and fill in the remaining fields accordingly as showin in the picture below:
Next set the Swarm Size to use one manager and four worker nodes, and select the right ssh key to be used for your account (the same that we created in Section Before you begin above):
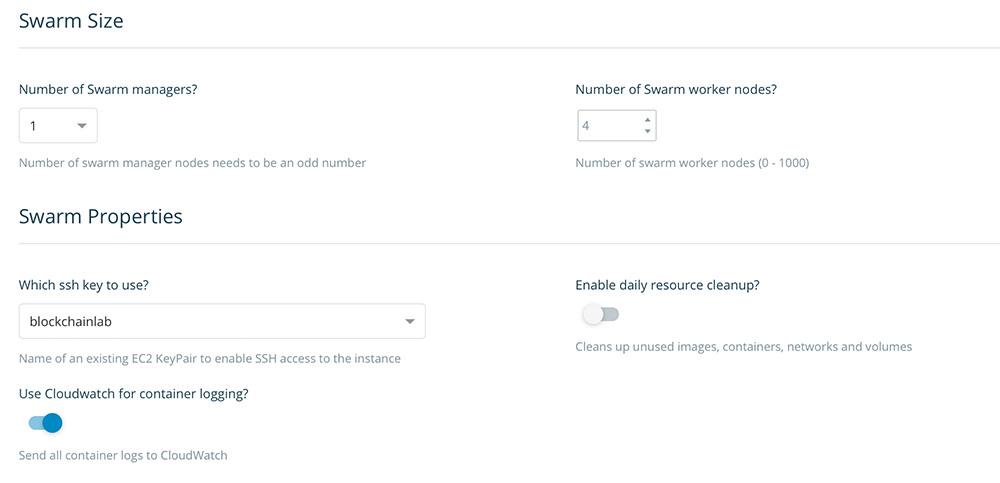
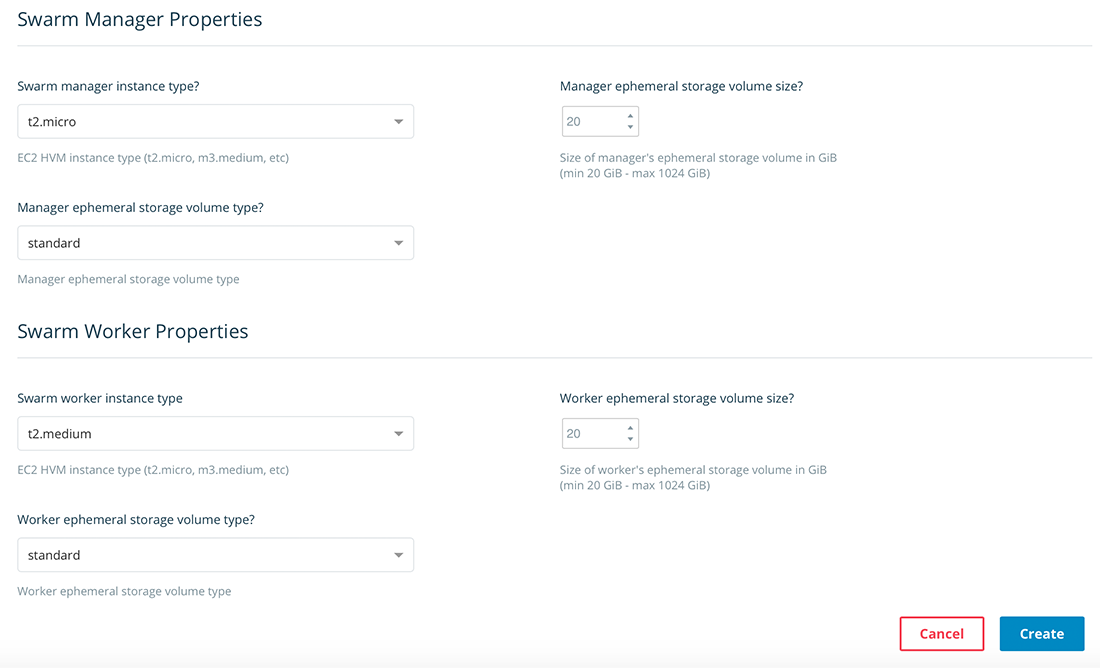
Finally, set the Swarm Manager and Swarm Worker properties. We use a t2.micro instance for the manager (where we only intend to run the bootnode and the visualiser), and t2.medium for the worker nodes:
Click Create. Docker Cloud will start creating the Swarm on your AWS account. Please be patient. It may take some time (usually less than 10 minutes). A green dot next to your Swarm name will stop blinking when Swarm is ready.
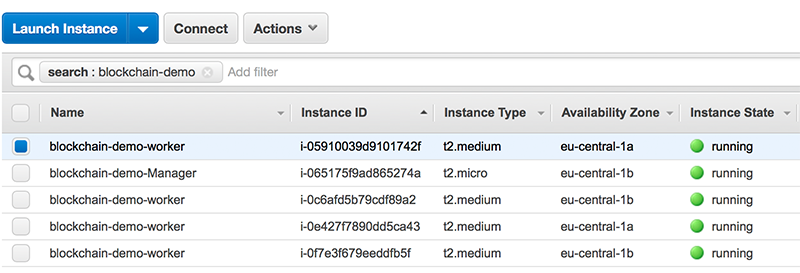
After Swarm is created, you will see the following EC2 instances on your AWS account:
Updating Security Groups for EC2 instances
Docker Cloud does a pretty good job. The Swarm is ready to start deploying our stacks, yet, it does not know what kind of services we are going to deploy and which additional ports needs to be exposed.
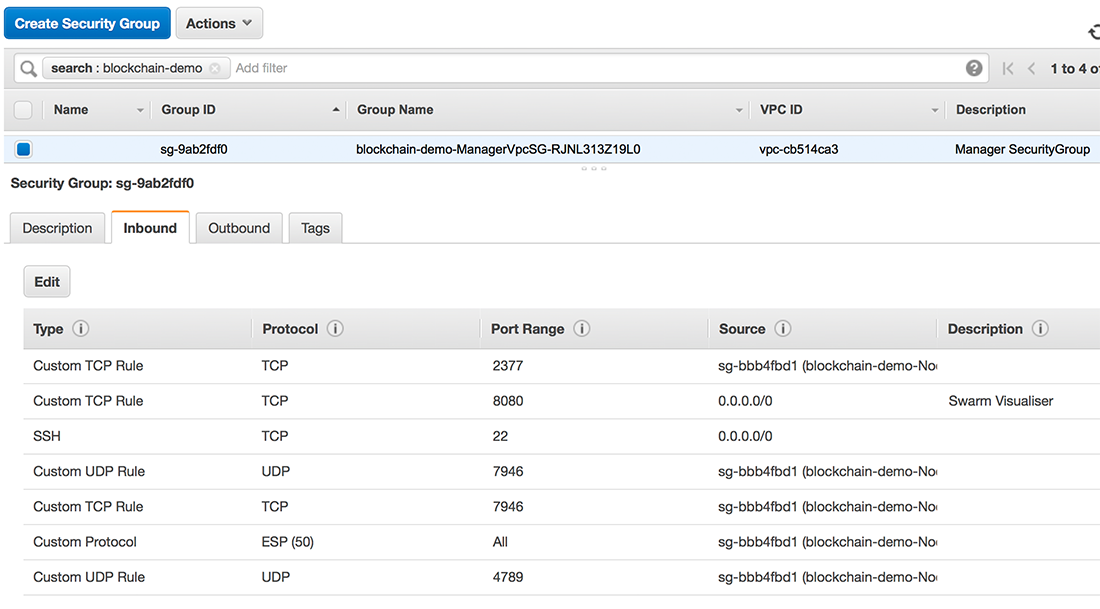
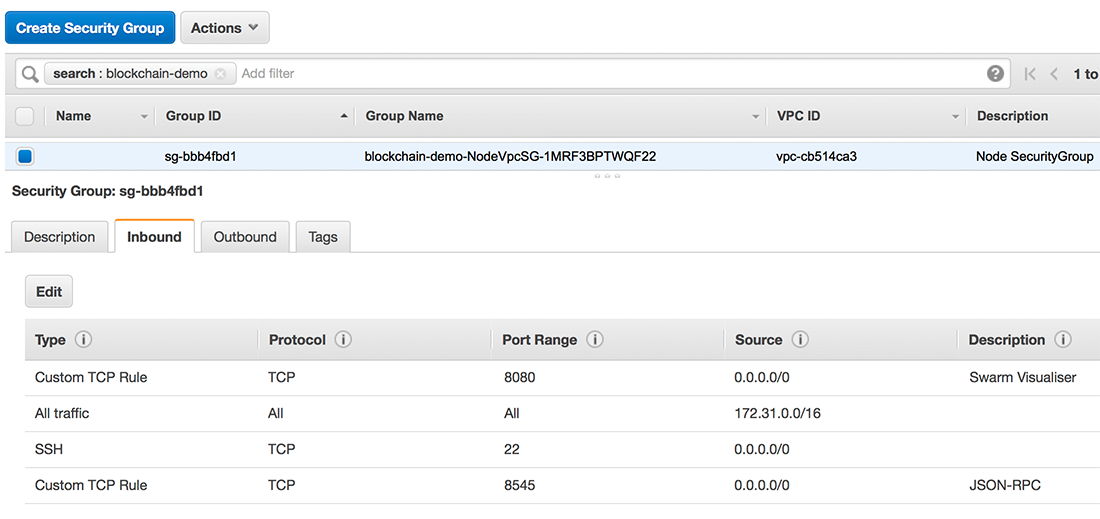
Docker cloud creates the following Security Groups: blockchain-demo-SwarmWide, blockchain-demo-ManagerVpc, blockchain-demo-ExternalLoadBalancer, and blockchain-demo-NodeVpc. In order to have access to visualizer we need expose port 8080 on the blockchain-demo-ManagerVpc security group. Because visualizer uses ingress port publishing, we can access it using public DNS address (or public IP) of any node in our Swarm. For this to work we need to expose port 8080 also in the blockchain-demo-NodeVpc. Finally, our worker nodes will be running the blockchain nodes which expose JSON-RPC interface to connect the wallet app. Therefore, blockchain-demo-NodeVpc needs to have port 8545 open as well. Finally, in order to SSH the worker instances, we need to make sure that port 22 is also open. The pictures below show the updated Security Groups:
Deploying blockchain nodes
We are ready to deploy our blockchain nodes.
First access the Swarm manager, either by using Docker for Mac or by copying the connect command from the Docker Cloud:
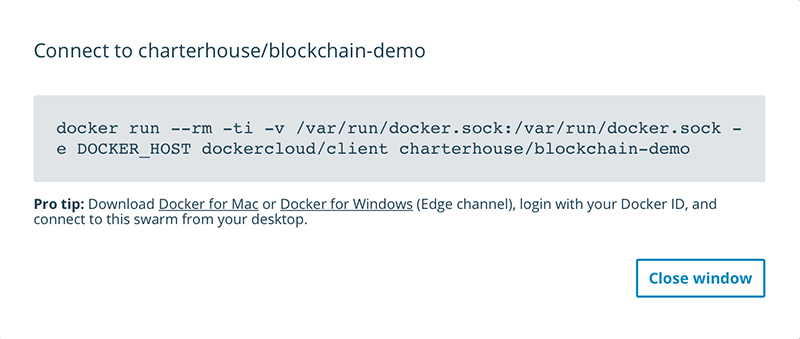
and pasting in into your terminal session:
$ docker run --rm -ti -v /var/run/docker.sock:/var/run/docker.sock -e DOCKER_HOST dockercloud/client charterhouse/blockchain-demo
=> You can now start using the swarm charterhouse/blockchain-demo by executing:
	export DOCKER_HOST=tcp://127.0.0.1:32770
$ export DOCKER_HOST=tcp://127.0.0.1:32770
We are now connected to the Swarm manager and we can see the nodes in our swarm by doing:
% docker node ls
ID                            HOSTNAME                        STATUS              AVAILABILITY        MANAGER STATUS
fhxrtp5e5sxjtaa18nx1577h6     ip-172-31-25-127.ec2.internal   Ready               Active
vegyy3w9eam8bgvj4q8s8z7to     ip-172-31-27-189.ec2.internal   Ready               Active
gzn6ur9ymazrvwsj8klbjojm7 *   ip-172-31-34-190.ec2.internal   Ready               Active              Leader
87bxai2z2isx4kvo48pcpvygi     ip-172-31-38-41.ec2.internal    Ready               Active
0rcpzwf9sx9gwmakwvj92lim9     ip-172-31-41-119.ec2.internal   Ready               Active
We are ready to deploy our stacks.
We have two separate stacks: boot-stack and nodes-stack. boot-stack is
for deploying bootnode, visualizer, and to create the overlay network
over which all our nodes will communicate. The nodes-stack will deploy
the nodes and, optionally, dedicated miners.
Deploying the boot-stack
Here is the docker compose file for the bootstack (boot-stack.yml):
version: "3.4"
services:
  bootnode:
    image: charterhouse/blockchain-bootnode:v0.1
    deploy:
      placement:
        constraints:
          - node.role == manager
      restart_policy:
        condition: on-failure
    ports:
      - target: 30301
        published: 30301
        protocol: tcp
        mode: host
    volumes:
      - type: volume
        source: data
        target: /node/data
    networks:
      - blockchain-net
  visualizer:
    image: dockersamples/visualizer:stable
    ports:
      - "8080:8080"
    volumes:
      - "/var/run/docker.sock:/var/run/docker.sock"
    deploy:
      placement:
        constraints:
          - node.role == manager
    networks:
      - blockchain-net
networks:
  blockchain-net:
volumes:
  data:
From the terminal (the one connected to the , we run:
% docker stack deploy -c boot-stack.yml boot
Creating network boot_blockchain-net
Creating service boot_bootnode
Creating service boot_visualizer
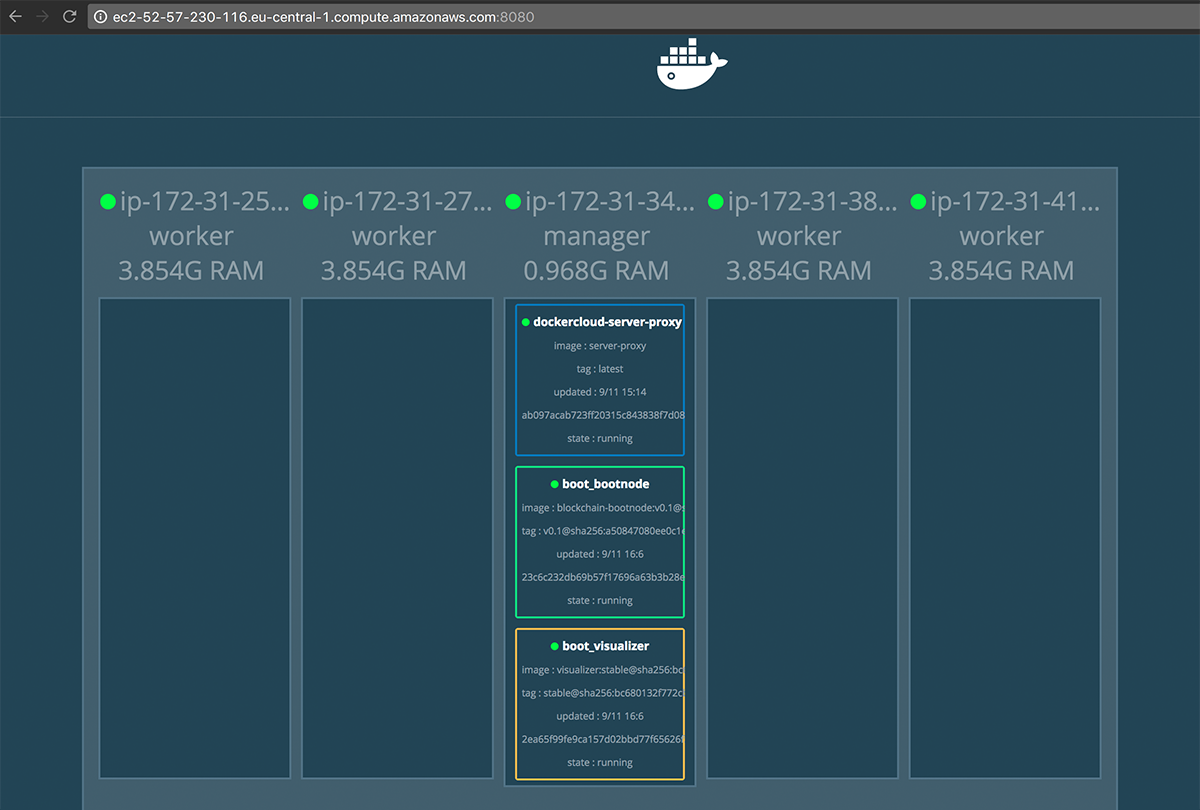
Now, from our AWS console we can grab public DNS of one of our nodes (does not matter which one) and we should be able to connect to the visualizer to see all the deployed services:
Deploying the nodes-stack
In order to deploy the nodes-stack, we need to know the enode url of the bootnode.
Therefore, from our Swarm Manager console we need to connect to our bootnode in order
to learn its enode url:
$ docker exec -it 23c6c232db69 /bin/bash
root@23c6c232db69:/node# cat blockchain.log
WARN [11-09|15:06:44] No etherbase set and no accounts found as default
INFO [11-09|15:06:44] Starting peer-to-peer node               instance=Geth/v1.7.2-stable-1db4ecdc/linux-amd64/go1.9
INFO [11-09|15:06:44] Allocated cache and file handles         database=/node/data/geth/chaindata cache=128 handles=1024
WARN [11-09|15:06:44] Upgrading database to use lookup entries
INFO [11-09|15:06:44] Initialised chain configuration          config="{ChainID: 5 Homestead: 0 DAO: <nil> DAOSupport: false EIP150: <nil> EIP155: 0 EIP158: 0 Byzantium: <nil> Engine: unknown}"
INFO [11-09|15:06:44] Disk storage enabled for ethash caches   dir=/node/data/geth/ethash count=3
INFO [11-09|15:06:44] Disk storage enabled for ethash DAGs     dir=/root/.ethash          count=2
INFO [11-09|15:06:44] Initialising Ethereum protocol           versions="[63 62]" network=5
INFO [11-09|15:06:44] Loaded most recent local header          number=0 hash=868042…14a7a3 td=131072
INFO [11-09|15:06:44] Loaded most recent local full block      number=0 hash=868042…14a7a3 td=131072
INFO [11-09|15:06:44] Loaded most recent local fast block      number=0 hash=868042…14a7a3 td=131072
INFO [11-09|15:06:44] Regenerated local transaction journal    transactions=0 accounts=0
INFO [11-09|15:06:44] Starting P2P networking
INFO [11-09|15:06:44] Database deduplication successful        deduped=0
INFO [11-09|15:06:46] UDP listener up                          self=enode://96e26cf742db3f4bd74d7f7e11e87d83abba370e227756f3da735a902c3c07584f3bc077d1988091a91f68c0f0dec3a23704948ebe061c1a0484f63f63054ae4@[::]:30301
INFO [11-09|15:06:46] RLPx listener up                         self=enode://96e26cf742db3f4bd74d7f7e11e87d83abba370e227756f3da735a902c3c07584f3bc077d1988091a91f68c0f0dec3a23704948ebe061c1a0484f63f63054ae4@[::]:30301
INFO [11-09|15:06:46] IPC endpoint opened: /node/data/geth.ipc
We can also test if the ipc communication channel works and do:
root@23c6c232db69:/node# geth attach ipc:/node/data/geth.ipc
Welcome to the Geth JavaScript console!

instance: Geth/v1.7.2-stable-1db4ecdc/linux-amd64/go1.9
 modules: admin:1.0 debug:1.0 eth:1.0 miner:1.0 net:1.0 personal:1.0 rpc:1.0 txpool:1.0 web3:1.0

> admin.nodeInfo.enode
"enode://96e26cf742db3f4bd74d7f7e11e87d83abba370e227756f3da735a902c3c07584f3bc077d1988091a91f68c0f0dec3a23704948ebe061c1a0484f63f63054ae4@[::]:30301"
> admin.peers
[]
From the output above, we see that currently there are no other nodes connected.
In order to have a valid enode url we still need to replace [::] in
the enode url above with the private IP of the Swarm Manager
(where the bootnode is deployed). We read this private IP from the AWS EC2 Dashboard.
Our complete enode url is:
enode://96e26cf742db3f4bd74d7f7e11e87d83abba370e227756f3da735a902c3c07584f3bc077d1988091a91f68c0f0dec3a23704948ebe061c1a0484f63f63054ae4@172.31.34.190:30301
We will this enode url in the nodes-stack.yml file as a value for the command property:
version: "3.4"
services:
  node:
    image: charterhouse/blockchain-node:v0.1
    command: enode://96e26cf742db3f4bd74d7f7e11e87d83abba370e227756f3da735a902c3c07584f3bc077d1988091a91f68c0f0dec3a23704948ebe061c1a0484f63f63054ae4@172.31.34.190:30301
    deploy:
      mode: global
      restart_policy:
        condition: on-failure
      placement:
        constraints:
          - node.role != manager
    ports:
      - target: 30303
        published: 30303
        protocol: tcp
        mode: host
      - target: 8545
        published: 8545
        protocol: tcp
        mode: host
    volumes:
      - type: volume
        source: data
        target: /node/data
    networks:
      - boot_blockchain-net
volumes:
  data:
networks:
  boot_blockchain-net:
    external: true
Now, from the Swarm Manager terminal, we run:
$ docker stack deploy -c nodes-stack.yml nodes
Creating service nodes_node
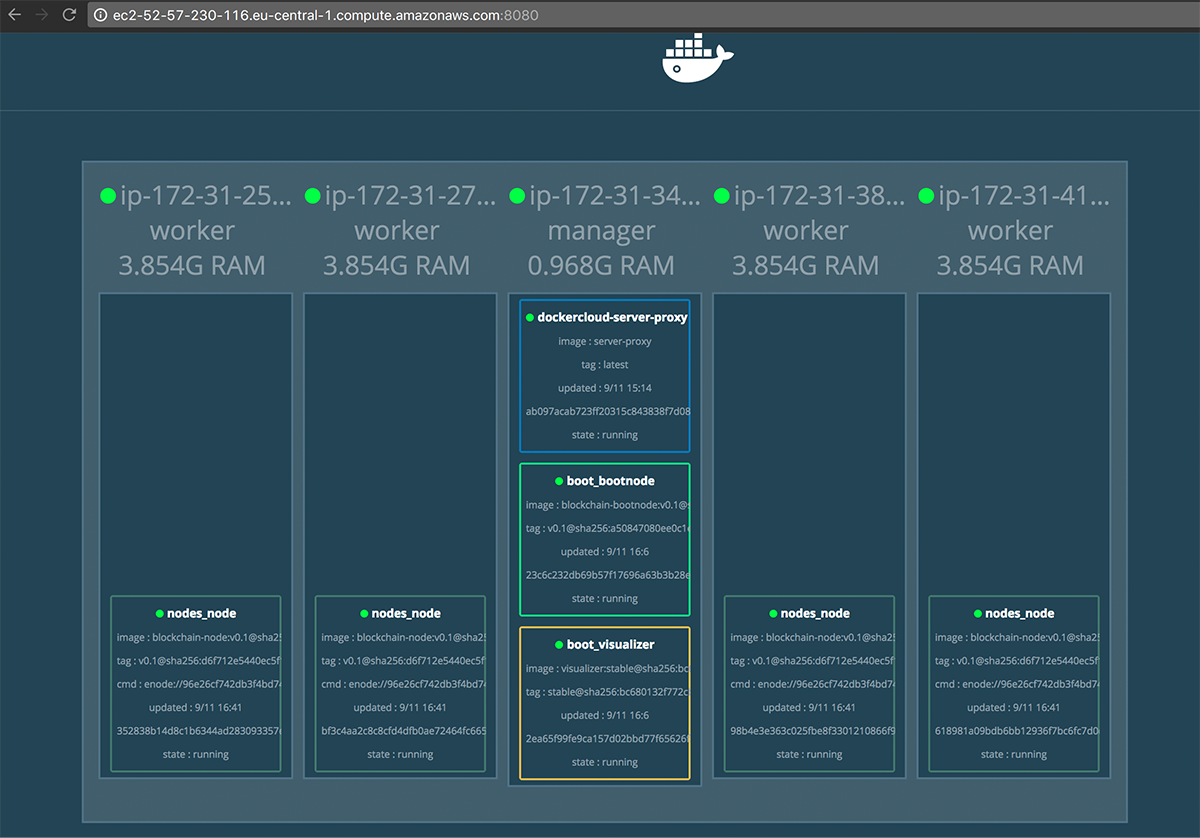
We can confirm on the visualizer that the deployment was successful:
We can also verify that all nodes are connected to the bootnode by investigating
its admin.peers property as we have shown earlier above:
% docker exec -it 23c6c232db69 /bin/bash
root@23c6c232db69:/node# geth attach ipc:/node/data/geth.ipc
Welcome to the Geth JavaScript console!

instance: Geth/v1.7.2-stable-1db4ecdc/linux-amd64/go1.9
 modules: admin:1.0 debug:1.0 eth:1.0 miner:1.0 net:1.0 personal:1.0 rpc:1.0 txpool:1.0 web3:1.0

> admin.peers
[{
    caps: ["eth/63"],
    id: "43d51f7017fb1525fe66a2018086cf116d0ef8db235e9af14df5b1cd9d15eece0b325e7df1f75ac56c848190ddb15f5857b4df1a71c6390203f57e2bfc197397",
    name: "Geth/v1.7.2-stable-1db4ecdc/linux-amd64/go1.9",
    network: {
      localAddress: "172.18.0.5:30301",
      remoteAddress: "172.31.41.119:33404"
    },
    protocols: {
      eth: {
        difficulty: 131072,
        head: "0x868042dae1e42f31144d7e19a3e2917adecbd9314ecf4e83d203f91ea614a7a3",
        version: 63
      }
    }
}, {
    caps: ["eth/63"],
    id: "46d6a2cdb7721bc880e37391dca35093ac71d21be50c2f8a636633ef452cbdb2901b798241b09fcdc3acb2e7623de1c04afe57bf1dfc351dfacd105436672cd5",
    name: "Geth/v1.7.2-stable-1db4ecdc/linux-amd64/go1.9",
    network: {
      localAddress: "172.18.0.5:30301",
      remoteAddress: "172.31.25.127:45660"
    },
    protocols: {
      eth: {
        difficulty: 131072,
        head: "0x868042dae1e42f31144d7e19a3e2917adecbd9314ecf4e83d203f91ea614a7a3",
        version: 63
      }
    }
}, {
    caps: ["eth/63"],
    id: "59085eb39ee57b62c3576f2ecbedae0af73acbbe5766cdf58bd8acd88b2ee0ddbb481442f43e896e41325403d65db699419f140136a5873f84691bcd04cd3bc8",
    name: "Geth/v1.7.2-stable-1db4ecdc/linux-amd64/go1.9",
    network: {
      localAddress: "172.18.0.5:30301",
      remoteAddress: "172.31.27.189:37212"
    },
    protocols: {
      eth: {
        difficulty: 131072,
        head: "0x868042dae1e42f31144d7e19a3e2917adecbd9314ecf4e83d203f91ea614a7a3",
        version: 63
      }
    }
}, {
    caps: ["eth/63"],
    id: "b50d3c81de6776f381db1bccc5ebdad0fb1d9013eff038eb0c9d8a62c1e14a6c2c6426b2fa8980cadfc06986de1d5a1ab10b14712984cfeb990966888a09fdf2",
    name: "Geth/v1.7.2-stable-1db4ecdc/linux-amd64/go1.9",
    network: {
      localAddress: "172.18.0.5:30301",
      remoteAddress: "172.31.38.41:49364"
    },
    protocols: {
      eth: {
        difficulty: 131072,
        head: "0x868042dae1e42f31144d7e19a3e2917adecbd9314ecf4e83d203f91ea614a7a3",
        version: 63
      }
    }
}]
>
Our network is ready to use.
Setting up Ethereum accounts
In order to setup an Ethereum account for a blockchain node, we need to login first to this node. From a separate terminal:
ssh -i ~/.ssh/aws/blockchainlab.pem docker@ec2-18-195-85-73.eu-central-1.compute.amazonaws.com
The authenticity of host 'ec2-18-195-85-73.eu-central-1.compute.amazonaws.com (18.195.85.73)' can't be established.
ECDSA key fingerprint is SHA256:fDFy4ZF6a7C61cFgIhuTREAr7qnU7nbkFVMGwQGI2q8.
Are you sure you want to continue connecting (yes/no)? yes
Warning: Permanently added 'ec2-18-195-85-73.eu-central-1.compute.amazonaws.com,18.195.85.73' (ECDSA) to the list of known hosts.
Welcome to Docker!
~ $ docker container ls
CONTAINER ID        IMAGE                                COMMAND                  CREATED             STATUS              PORTS                                              NAMES
bf3c4aa2c8c8        charterhouse/blockchain-node:v0.1    "/node/start.sh en..."   29 minutes ago      Up 29 minutes       0.0.0.0:8545->8545/tcp, 0.0.0.0:30303->30303/tcp   nodes_node.vegyy3w9eam8bgvj4q8s8z7to.j6bqcf5oyqv6venqtqpgy47js
bf071c22b131        docker4x/guide-aws:17.09.0-ce-aws1   "/entry.sh"              2 hours ago         Up 2 hours                                                             guide-aws
387e29570a30        docker4x/shell-aws:17.09.0-ce-aws1   "/entry.sh /usr/sb..."   2 hours ago         Up 2 hours          0.0.0.0:22->22/tcp                                 shell-aws
~ $
Now, we can connect to the container and then to ethereum node using ipc channel and create user account:
~ $ docker exec -it bf3c4aa2c8c8 /bin/bash
root@bf3c4aa2c8c8:/node# geth attach ipc:/node/data/geth.ipc
Welcome to the Geth JavaScript console!

instance: Geth/v1.7.2-stable-1db4ecdc/linux-amd64/go1.9
 modules: admin:1.0 debug:1.0 eth:1.0 miner:1.0 net:1.0 personal:1.0 rpc:1.0 txpool:1.0 web3:1.0

> personal.newAccount()
Passphrase:
Repeat passphrase:
"0x28825f00d57a8566265a7182c906b59ad9233f7f"
>
In all our example we use the same password for each account:
test
Connecting to the node with Mist
In order to connect to the node with Mist, run the following command:
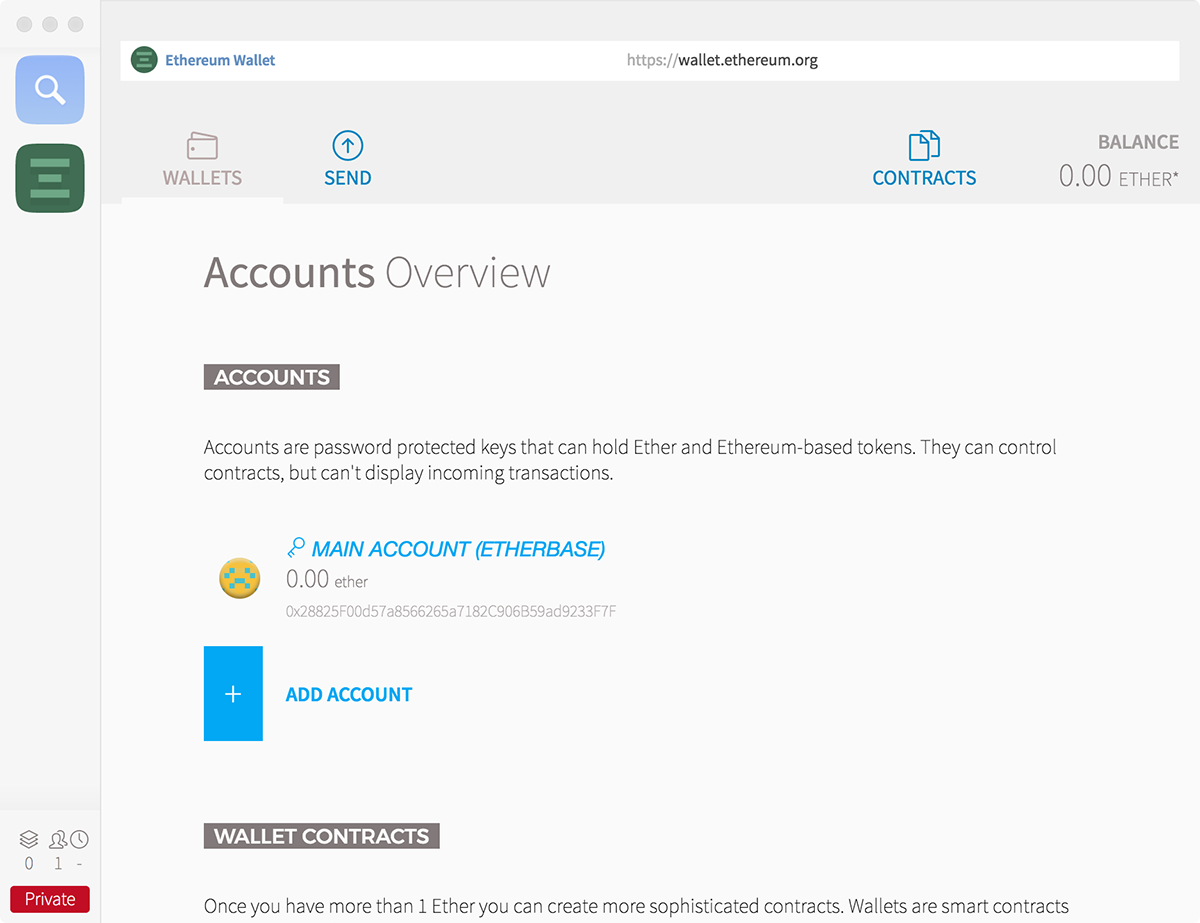
$ /Applications/Mist.app/Contents/MacOS/Mist --rpc http://18.195.85.73:8545 --swarmurl "null"
This will start a new window where you will see the account number that we just created:
Now, back from the geth console session, we can start mining and, after some time, see the account balance on the Mist wallet increasing:
> miner.start(4)
null
4above is for number of threads. You can stop mining by doingminer.stop().

In order to complete the setup, follow the above steps for other nodes.
Docker Images
The source code repository for this post can be found in our Charterhouse github account at https://github.com/Charterhouse/private-blockchain.
In folders bootnode, node, and miner you will find the dockerfiles corresponding
to the docker images used in the boot-stack.yml and nodes-stack.yml files. We published the ready to use images images on Docker Hub. These are
charterhouse/blockchain-bootnode:v0.1, charterhouse/blockchain-node:v0.1, and
charterhouse/blockchain-miner:v0.1 respectively. For simplicity, in our current setup
we do not use a separate miner.
In order to change images, for each image, run in the image directory:
$ docker build -t <your-image-tag> .
$ docker push <your-image-tag>
If you push the images to Docker Hub, you will need to login using the
docker logincommand. Login with your username, notcharterhouse.